
| Up |
|
History of Buttock Augmentation The American Journal of Cosmetic Surgery , Vol. 14, No. 4, 1997. In the era of increasing interest in body contouring, as early as 1969, plastic surgeons were reporting on their attempts to improve the shape of the lateral gluteal regions using prosthesis of the same consistency as the Cronin breast prosthesis. Among the first published reports of attempting aesthetic buttock augmentation were articles by Bartels et al (1969), 1 Douglas et al (1975), 2 and Cocke and Ricketson (1975), 3 who utilized a version of the Cronin NFP design prosthesis. These early attempts at gluteal implants had complications such as secondary infections, sag as the patient grew older and, in some cases, actual rupture during serious falls.4 Each of these authors concluded that there was a need for a more permanent, safer type of prosthesis. In some of the early buttock augmentations by Cocke and Ricketson, 3 the implants were not placed over the weight-bearing areas. Bartels et al 1 utilized the gel silicone implants, but there was still the danger of the silicone implant rupturing or of secondary infection because of the location of the incision.2 In the majority of these early procedures, the patient required hospitalisation and 5-7 days of bed rest. By the early 1970s, Gonzales-Ulloa5 had developed a procedure that would provide a correctly positioned gluteal prosthesis for enlargement of underdeveloped buttocks. He recognized that the thickness and resistance of the covering of the augmented prosthesis had to withstand the pressure exerted when the patient sat down abruptly and should have the same consistency as the area when palpated. A large number of Gonzales-Ulloa's procedures were performed on patients who had suffered severe damage and/or deformation of the gluteal region due to silicone, collagen, or guaiacol injections or adipose tissue transplants. His method for correcting this procedure was most satisfactory, but some patients suffered secondary infections because of the proximity of the incision to the anal region.5.6. 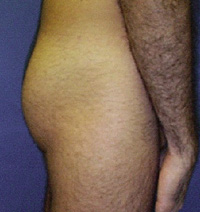
Lewis (1992)7 perfected the use of autologous fat grafting to correct deep gluteal depression and to provide a continuous, smooth S-curve to the buttock. His technique aided in the correction of underdeveloped buttocks, but did not resolve the problem of secondary infections when an gluteal prosthesis was implanted. There remained the need to continue to improve on the techniques developed by Gonzales-Ullao, Lewis and others. Concerned because buttock enlargements were becoming more popular, and the threat of secondary infections still prevailed, I took the matter under serious considerations. Using knowledge of anatomy, two other possible locations on the buttock were identified where the incision could successfully be made.. Since 1990, 22 buttock enlargement augmentations have been successfully completed using the new technique, with no major complications caused by infection, rupture, or displacement. 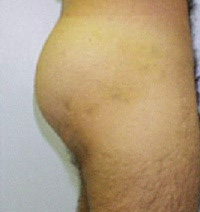
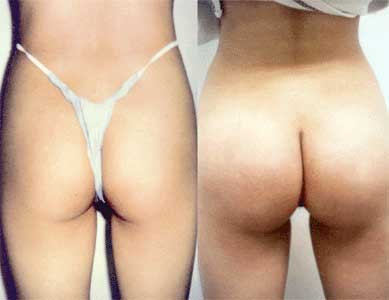
The tradition method of buttock enlargement, which involved making incision in the lover portion of the buttock in the infragluteal fold, frequently results in secondary infections and long recovered times. Because of the proximity of the incision to the rectum and the pressure on the incision, the patient usually require several days of bed rest. In some instances, it is necessary to remove an otherwise satisfactory implant to correct a infection. The author has overcome this problem by placing an incision in the centre of the buttock in the intergluteal fold. A customer-designed solid silicone prosthesis is then placed between the gluteus medius and the gluteus maximus in a space provided by the anatomical design of these tow large muscles. The gluteus also proved a good sling for the prosthesis, this preventing future drooping of the prosthesis. More than 20 buttock enlargements have been successfully performed using this technique with no major complications. Use of this new technique decreases the risk of infection from the anal region and produces a softer, more natural look. This technique is also resistant to possible rupture such as may occur with nonsolid gel silicone augmentation. THE BEST CANDIDATES FOR BUTTOCKS ENLARGEMENT 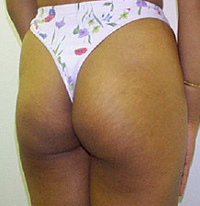
Buttock Implants are best for patients who only want extra fullness in the upper part of the buttocks. These procedures are for the individual who is unable to develop proportionate Gluteal muscles, or simply desires more augmentation in the buttock area. The buttocks are augmented with the use of implants specifically designed for such a use or with your own fat, if applicable. Weightlifters sometimes request Buttock implants to augment underdeveloped luteal muscles to give a more balanced look as they have less actual body fat percentage to liposuction and re-inject. TYPES OF ANESTHESIA 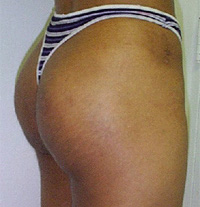
Buttocks augmentation are usually performed under general anesthesia, which means you'll sleep through the operation. THE SURGERY The implants are either made from solid silicone, a firm yet pliable material or a more softer form of cohesive silicone encased in a silicone bag. With cohesive silicone, there is a more natural feel and if there is a rupture these cohesive silicone is reported not to leak. The solid silicone implant is made of the same material as used in some chin implants, male pectoral implants and calf implants. This implant was once "clear" but is now mostly manufactured "brilliant white". However the demonstration models are bright blue for easier contour viewing. This implant is more resistant to wear and tear than a gel or saline filled mammary type of implant. In the Buttock Implant procedure- the implant is placed between the fascia (the thick, white connective tissue, covering the actual muscle) and the muscle itself. The implants are placed above the "sitting area" so you never actually sit on them. To get a better idea as to where Buttock implants would be placed, sit down, with good posture and feel where your jean back pockets are (or would be)... that is where the implants would sit. The incisions are made where the "cheek" meets the back of the thigh. Within a year, after full maturation of the scar, you will be unable to tell that you had a surgery. I mean you would have to bend over and stick your rear close to a mirror and have a high powered flashlight and look real close to see the scar. Then again, why would you do this? Another incision is also being made within the "crack". This scar placement is "ideal" but the infection rate is higher. As with any procedure there is always a plus and minus of the various techniques or placements of incisions. AFTER YOUR SURGERY Well, you get to sleep on your stomach for 2 weeks or more with this procedure. Expect to be down for about 2 weeks. There will be swelling and bruising which can be remedied with your prescribed pain medication and ice packs. The sutures are taken out in about 10 days and you MUST be very careful not to move around too quickly. Take it easy. Bandages: You will have a compression garment on after surgery. Make sure the garment is flat against your skin, without any wrinkles r folds. Do not remove it until the 5th day when you shower. You will continue to use the compression garment for 6-12 weeks. Activity Level: ALL SURGERY CARRIES SOME UNCERTAINTY AND RISK 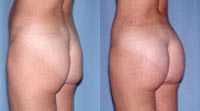
There is is the possibility of infection and a higher shifting rate. Especially in those patients who do not allow themselves proper recovery time. Also reported: asymmetry, misplacement, rotation, seroma, hematoma, and the implant "falling" to a lower region, ending up with a 'saggy' rear end. This is normally due to doing too much, too soon and not letting the implant settle correctly. You MUST let your body heal or you will be sorry, period. This goes with all surgeries. You may feel better, but that doesn't mean you ARE better. |
|
Reval Clinic - KT Kliinik
Kaluritee 5A Tallinn ESTONIA
Email: revalclinic@revalclinic.com
|